In this tutorial, we will build a video uploading and streaming application using NestJS and Cloudinary. We will separate our code into a service and a controller, and use Multer for handling file uploads.
Prerequisites
- Basic knowledge of TypeScript and NestJS
- Node.js installed on your machine
- A Cloudinary account. Sign up for a free account here.
Setting up the NestJS project
- Install the Nest CLI globally by running
npm install -g @nestjs/cli- Create a new NestJS project by running
nest new video-uploading-app- Change to the project directory
cd video-uploading-appNavigate to the project folder and install the necessary packages:
npm i @nestjs/platform-express multer cloudinary @nestjs/config @types/multerSetting up environment variables and ConfigModule
Create a .env file in the root of your project (same level as package.json) and add your Cloudinary credentials:
CLOUDINARY_CLOUD_NAME=<your-cloudinary-cloud-name>
CLOUDINARY_API_KEY=<your-cloudinary-api-key>
CLOUDINARY_API_SECRET=<your-cloudinary-api-secret>
Create a cloudinary.provider.ts file to provide the service with the Cloudinary environment variables.
import { Provider } from '@nestjs/common';
import { ConfigService } from '@nestjs/config';
import { v2 as cloudinary } from 'cloudinary';

export const CloudinaryProvider: Provider = {
  provide: 'CLOUDINARY',
  useFactory: (configService: ConfigService) => {
    cloudinary.config({
      cloud_name: configService.get('CLOUDINARY_CLOUD_NAME'),
      api_key: configService.get('CLOUDINARY_API_KEY'),
      api_secret: configService.get('CLOUDINARY_API_SECRET'),
    });
    return cloudinary;
  },
  inject: [ConfigService],
};
Creating the videos module, controller, and service
Generate the videos module, controller, and service using the Nest CLI:
nest g mo cloudinary
nest g co cloudinary
nest g s cloudinary
Open the project in your favorite code editor.
Navigate a cloudinary.module.ts file in the src folder and configure the Cloudinary module:
update the module by importing our ConfigModule which contains
import { Module } from '@nestjs/common';
import { CloudinaryController } from './cloudinary.controller';
import { MulterModule } from '@nestjs/platform-express';
import * as multer from 'multer';
import { CloudinaryService } from './cloudinary.service';
import { CloudinaryProvider } from 'src/cloudinary/cloudinary.provider';
import { ConfigModule } from '@nestjs/config';

@Module({
  imports: [
    ConfigModule.forRoot(),
    MulterModule.register({
      storage: multer.memoryStorage(),
    }),
  ],
  providers: [CloudinaryService, CloudinaryProvider],
  exports: [CloudinaryService, CloudinaryProvider],
  controllers: [CloudinaryController],
})
export class CloudinaryModule {}
we used Multer with memory storage, which stores the files in memory as Buffer objects instead of writing them to disk.
Using memory storage can be helpful in situations where you don't want to store the uploaded files on the server, but instead, want to process them and send them to another service like Cloudinary.
But, Keep in mind that using memory storage might cause your application to run out of memory when uploading very large files or a large number of small files quickly expressjs.com. If you decide to use memory storage, ensure that you have proper memory management and limits in place to prevent potential issues.
Implementing the videos controller
In the src/cloudinary/cloudinary.controller.ts file, update the controller code:
import {
  Controller, Post, UseInterceptors, UploadedFile, Get, Param, Res,
} from '@nestjs/common';
import { FileInterceptor } from '@nestjs/platform-express';
import { Response } from 'express';
import { CloudinaryService } from './cloudinary.service';

@Controller('videos')
export class CloudinaryController {
  constructor(private readonly cloudinaryService: CloudinaryService) {}

  @Post('upload')
  @UseInterceptors(FileInterceptor('file'))
  async uploadVideo(@UploadedFile() file: Express.Multer.File) {
    return this.cloudinaryService.uploadVideo(file);
  }

  @Get(':publicId/thumbnail')
  async getThumbnail(
    @Param('publicId') publicId: string,
    @Res() res: Response,
  ) {
    const thumbnailUrl = await this.cloudinaryService.getThumbnail(publicId);
    res.status(200).json({ thumbnailUrl });
  }

  @Get(':publicId/stream')
  async streamVideo(@Param('publicId') publicId: string, @Res() res: Response) {
    const videoUrl = await this.cloudinaryService.streamVideo(publicId);
    res.status(200).json({ videoUrl });
  }
}
POST /videos/upload: This route is responsible for uploading a video to Cloudinary. It uses theFileInterceptorfrom@nestjs/platform-expressto handle the file upload. The interceptor extracts the file from the request and passes it to theuploadVideomethod of theCloudinaryService. The method processes the file and uploads it to Cloudinary.GET /videos/:publicId/thumbnail: This route is responsible for fetching a video thumbnail from Cloudinary. It takes thepublicIdof the video as a parameter and calls thegetThumbnailmethod of theCloudinaryService. The method generates a thumbnail URL and sends it back as a JSON response.GET /videos/:publicId/stream: This route is responsible for streaming a video from Cloudinary. It takes thepublicIdof the video as a parameter and calls thestreamVideomethod of theCloudinaryService. The method generates a streaming URL and sends it back as a JSON response.
Implementing the videos service
In the src/videos/videos.service.ts file, update the service code:
import { Injectable } from '@nestjs/common';
import { v2 as cloudinary } from 'cloudinary';
import { Express } from 'express';

@Injectable()
export class CloudinaryService {
  async uploadVideo(file: Express.Multer.File) {
    return new Promise((resolve, reject) => {
      const uploadStream = cloudinary.uploader.upload_stream(
        {
          resource_type: 'video',
        },
        (error, result) => {
          if (error) {
            reject(error);
          } else {
            resolve(result);
          }
        },
      );
      uploadStream.end(file.buffer);
    });
  }

  async getThumbnail(publicId: string) {
    const thumbnailUrl = cloudinary.url(publicId, {
      resource_type: 'video',
      transformation: [
        {
          width: 300,
          height: 300,
          crop: 'fill',
        },
      ],
      format: 'png',
    });
    return thumbnailUrl;
  }

  async streamVideo(publicId: string) {
    const videoUrl = cloudinary.url(publicId, {
      resource_type: 'video',
      format: 'mp4',
      flags: 'streaming_attachment',
    });
    return videoUrl;
  }
}
In the CloudinaryService class, three methods are defined to interact with Cloudinary: uploading videos, generating video thumbnails, and streaming videos.
uploadVideo(file: Express.Multer.File): This method takes a Multer file object as input and uploads it to Cloudinary as a video. It returns a Promise that resolves with the upload result. The method uses thecloudinary.uploader.upload_streamfunction to create an upload stream, then writes the file buffer to the stream. If the upload is successful, the Promise resolves with the result; otherwise, it rejects with an error.getThumbnail(publicId: string): This method takes thepublicIdof a video and generates a thumbnail URL using Cloudinary'surlfunction. The thumbnail is resized to 300x300 pixels and returned in PNG format.streamVideo(publicId: string): This method takes thepublicIdof a video and generates a streaming URL using Cloudinary'surlfunction. The video is streamed in MP4 format with thestreaming_attachmentflag set.
Testing the API
To test the API, start the NestJS server:
npm run start:dev
Now, use Postman to test the following endpoints:
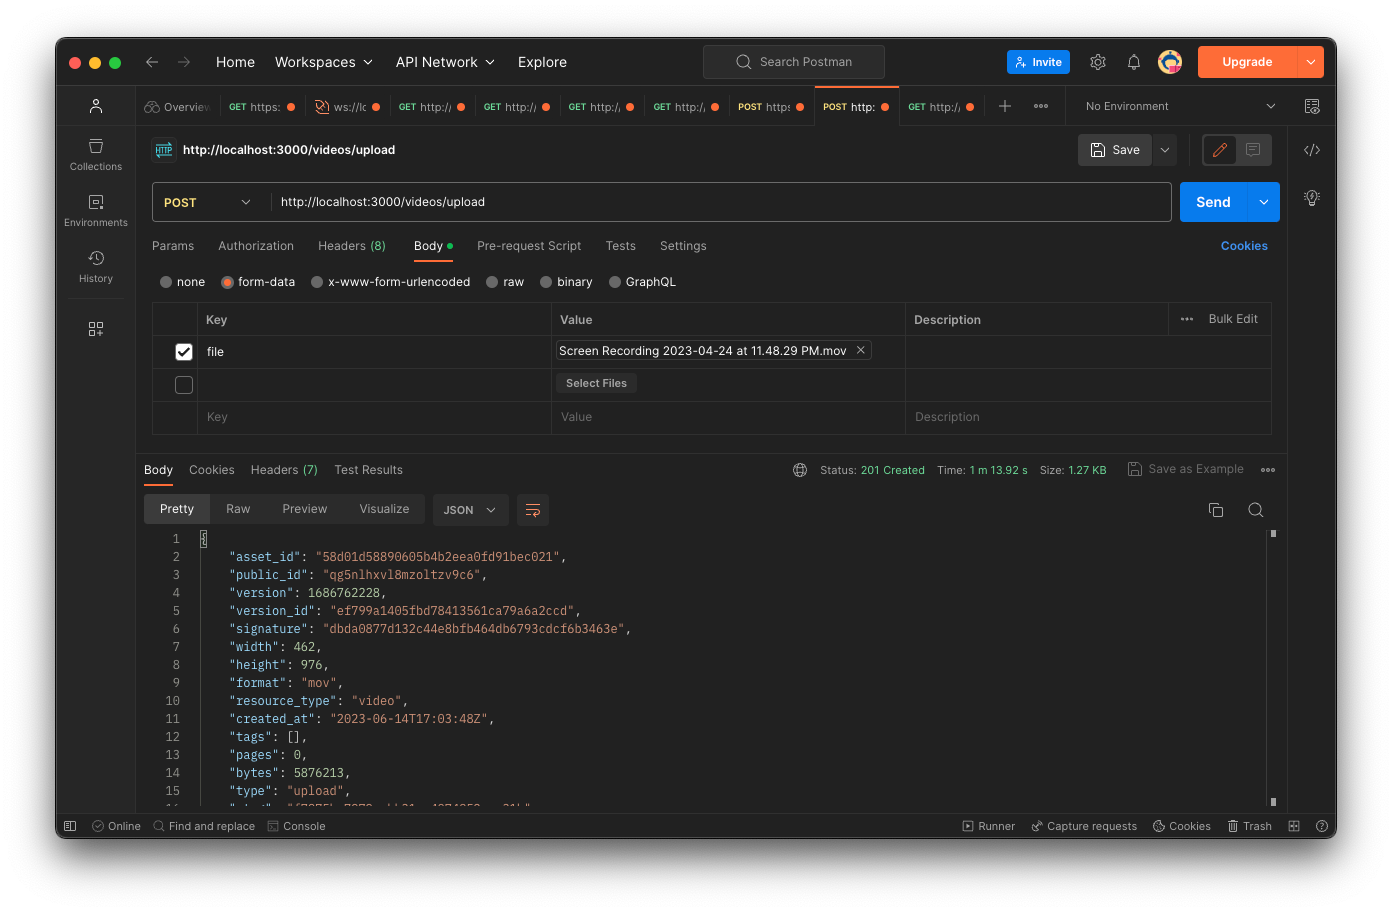
POST http://localhost:3000/videos/upload: Upload a video file using the "file" form field.
GET http://localhost:3000/videos/:publicId/thumbnail: Get a thumbnail for a video with the specified public ID.

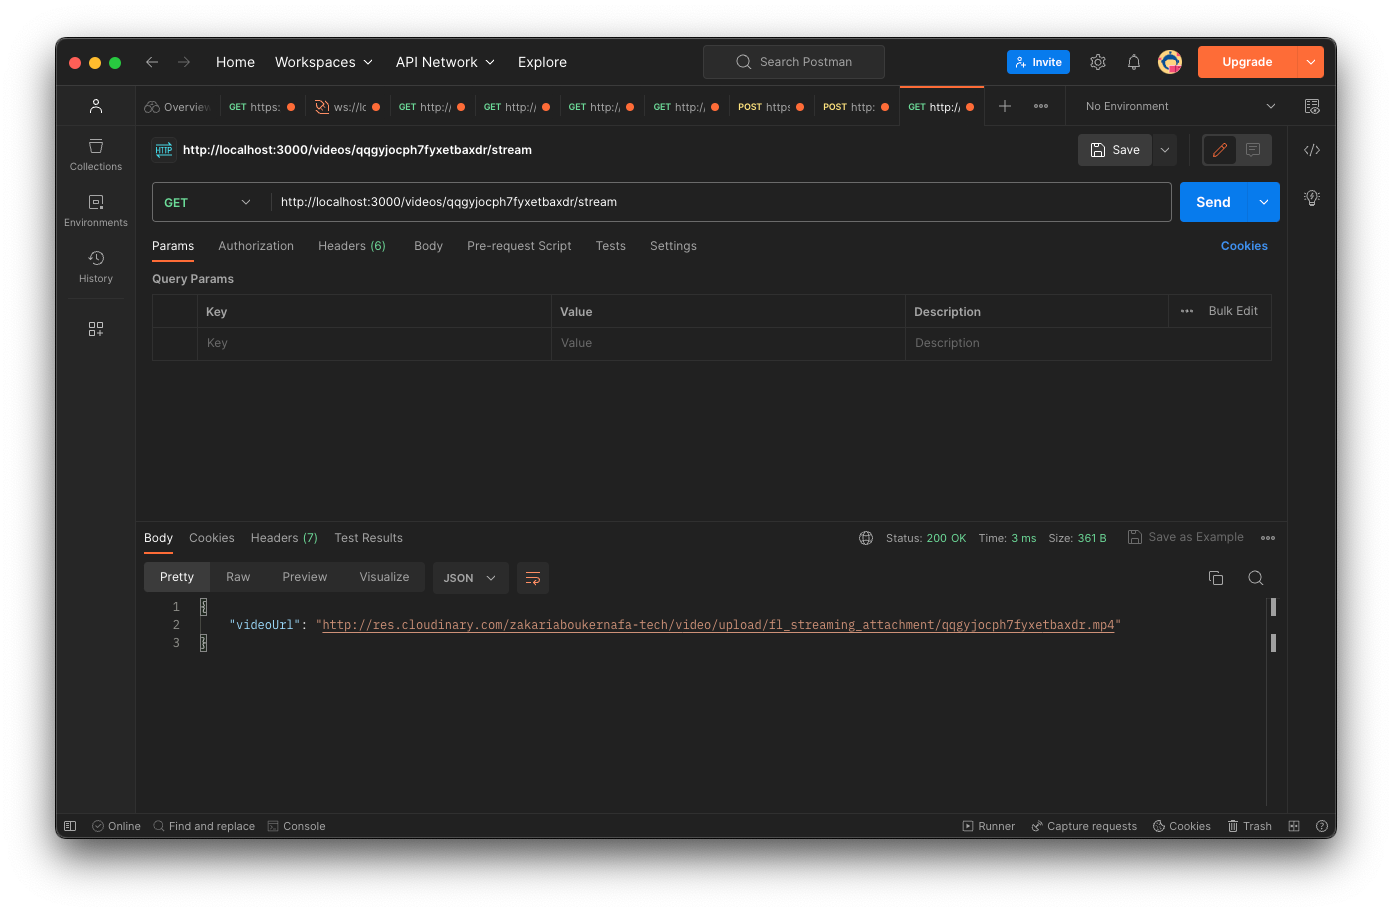
GET http://localhost:3000/videos/:publicId/stream: Stream a video with the specified public ID.
That's it! You have successfully created a video streaming API with NestJS, including video upload, transcoding, thumbnail generation, and streaming features.
You can check the project source code on Github.