In this discussion, let's dive into using Prisma with NestJS to create a simple yet powerful application. Picture Prisma as a type-safe database client and an ORM (Object-Relational Mapper) that smoothly connects to databases and interacts with data. Meanwhile, NestJS is a well-known TypeScript server-side application framework. By putting these two mighty tools together, we'll be able to craft a robust and scalable web application.
Now you may ask, how does Prisma work its magic? Prisma is like a helpful sidekick for developers, assisting them in reading and writing data to the database in an intuitive, efficient, and secure manner prisma.io. It slides right into your tech stack and plays well with your favorite frameworks, making it a breeze to build production-grade, strong, and scalable web applications.
Think of Prisma as a next-gen ORM that works like a charm with TypeScript and has been shaking up the backend world. Its main attraction is its ability to automatically generate types when the database model changes, which is a real game-changer! No more maintaining classes that map to data or writing complex SQL codewithvlad.com.
Instead of classes, Prisma uses a unique Schema Definition Language. Developers describe their schemas using this language, and Prisma runs over the schemas and writes the appropriate migrations depending on the chosen database. It also generates type-safe code to interact with the database codewithvlad.com.
In essence, Prisma offers an alternative to writing plain SQL queries or using other ORMs (such as TypeORM or Sequelize).
Why Prisma?
Prisma offers several advantages over traditional ORMs:
- Type-safe database client: Prisma Client is tailored to your schema and provides the strongest type-safety guarantees of all the ORMs in the TypeScript ecosystem prisma.io.
- Hassle-free migrations: Prisma Migrate auto-generates SQL migrations from your Prisma schema, giving you full control and flexibility from local development to production environments prisma.io.
- Visual database browser: Prisma Studio allows you to explore and manipulate data in your Prisma projects easily prisma.io.
User Management System
In this tutorial, we will create a simple User Management System using Prisma and NestJS. This application will allow us to perform CRUD (Create, Read, Update, and Delete) operations on users.
Step 1: Setting up NestJS
First, we need to set up a NestJS application. Follow the official NestJS documentation to create a new NestJS project.
Step 2: Adding Prisma to the project
Add Prisma 2.0, initialize the Prisma Schema, and install Prisma Client to your Nest application:
npm install prisma --save-dev
npx prisma init
npm install @prisma/clientStep 3: Configure Prisma
After initializing Prisma, you will have a prisma directory containing a schema.prisma file. This is the main configuration file that contains your database schema. Update the datasource block in the schema.prisma file to use your preferred database and connection details:
datasource db {
  provider = "postgresql"
  url      = env("DATABASE_URL")
}
Step 4: Define the User model
model User {
  id        Int      @id @default(autoincrement())
  firstName String
  lastName  String
  email     String   @unique
  createdAt DateTime @default(now())
  updatedAt DateTime @updatedAt
}
Step 5: Generate Prisma Client
npx prisma generate
npx prisma migrate dev --name init Step 6: Integrate Prisma with NestJS
Now, let's create a PrismaModulee and a PrismaService
nest generate module prisma
nest generate service prisma
the PrismaService inherits from the generated Prisma Client:
import { Injectable, OnModuleDestroy, OnModuleInit } from '@nestjs/common';
import { PrismaClient } from '@prisma/client';

@Injectable()
export class PrismaService extends PrismaClient
  implements OnModuleInit, OnModuleDestroy {
  async onModuleInit() {
    await this.$connect();
  }

  async onModuleDestroy() {
    await this.$disconnect();
  }
}
Step 7: Create User CRUD operations
Now, let's create a UsersModule and a UsersController to handle the CRUD operations for our User model:
nest generate module users
nest generate controller users
nest generate service users
make sure to import the Prisma Module into the user module
import { Module } from '@nestjs/common';
import { UsersController } from './users.controller';
import { PrismaModule } from 'src/prisma.module';
import { UsersService } from './users.service';

@Module({
  imports: [PrismaModule],
  controllers: [UsersController],
  providers: [UsersService],
})
export class UsersModule {}
In the UsersController, create the necessary CRUD operations using the UsersService:
import {
  Controller, Get, Post, Body, Patch, Param, Delete} from nestjs/common';
import { UsersService } from './users.service';
import { CreateUserDto } from './dto/create-user.dto';
import { UpdateUserDto } from './dto/update-user.dto';

@Controller('users')
export class UsersController {
  constructor(private readonly usersService: UsersService) {}

  @Post()
  create(@Body() createUserDto: CreateUserDto) {
    return this.usersService.create(createUserDto);
  }

  @Get()
  findAll() {
    return this.usersService.findAll();
  }

  @Get(':id')
  findOne(@Param('id') id: string) {
    return this.usersService.findOne(id);
  }

  @Patch(':id')
  update(@Param('id') id: string, @Body() updateUserDto: UpdateUserDto) {
    return this.usersService.update(id, updateUserDto);
  }

  @Delete(':id')
  remove(@Param('id') id: string) {
    return this.usersService.remove(id);
  }
}
Now in the UsersService, create logic operations using the PrismaService:
import { Injectable } from '@nestjs/common';
import { PrismaService } from '../prisma.service';
import { CreateUserDto } from './dto/create-user.dto';
import { UpdateUserDto } from './dto/update-user.dto';

@Injectable()
export class UsersService {
  constructor(private readonly prisma: PrismaService) {}

  create(createUserDto: CreateUserDto) {
    return this.prisma.user.create({ data: createUserDto });
  }

  findAll() {
    return this.prisma.user.findMany();
  }

  findOne(id: string) {
    return this.prisma.user.findUnique({ where: { id: parseInt(id) } });
  }

  update(id: string, updateUserDto: UpdateUserDto) {
    return this.prisma.user.update({
      where: { id: parseInt(id) },
      data: updateUserDto,
    });
  }

  remove(id: string) {
    return this.prisma.user.delete({ where: { id: parseInt(id) } });
  }
}
Step 8: Create DTOs
Create two DTOs: CreateUserDto and UpdateUserDto in the src/users/dto directory:
export class CreateUserDto {
  firstName: string;
  lastName: string;
  email: string;
}
import { CreateUserDto } from './create-user.dto';
import { PartialType } from '@nestjs/mapped-types';
export class UpdateUserDto extends PartialType(CreateUserDto) {}
Note you may need to install mapped-types for PartilType by using npm:
npm i @nestjs/mapped-types
Testing the Application
Let's automate tests for our project, we will use unit tests in combination with the Jest testing framework, which is included by default in NestJS applications.
Step 1: Write unit tests for UsersService
Create a new file users.service.spec.ts in the src/users directory (if you used the nest generator the file should be generated by default) :
import { Test, TestingModule } from '@nestjs/testing';
import { UsersService } from './users.service';
import { PrismaService } from '../prisma.service';

describe('UsersService', () => {
  let usersService: UsersService;
  let prismaService: PrismaService;

  beforeEach(async () => {
    const module: TestingModule = await Test.createTestingModule({
      providers: [UsersService, PrismaService],
    }).compile();

    usersService = module.get<UsersService>(UsersService);
    prismaService = module.get<PrismaService>(PrismaService);
  });

  it('should be defined', () => {
    expect(usersService).toBeDefined();
  });

  it('should create a user', async () => {
    const createUserDto = {
      firstName: 'John',
      lastName: 'Doe',
      email: 'john@example.com',
    };
    const result = createMockUser(
      1,
      createUserDto.firstName,
      createUserDto.lastName,
      createUserDto.email,
    );

    jest.spyOn(prismaService.user, 'create').mockResolvedValue(result);

    const user = await usersService.create(createUserDto);
    expect(user).toEqual(result);
    expect(prismaService.user.create).toHaveBeenCalledWith({
      data: createUserDto,
    });
  });

  it('should find all users', async () => {
    const result = [
      createMockUser(1, 'John', 'Doe', 'john@example.com'),
      createMockUser(2, 'Jane', 'Doe', 'jane@example.com'),
    ];

    jest.spyOn(prismaService.user, 'findMany').mockResolvedValue(result);

    const users = await usersService.findAll();

    expect(users).toEqual(result);
    expect(prismaService.user.findMany).toHaveBeenCalled();
  });

  it('should find a user by id', async () => {
    const id = '1';
    const result = createMockUser(1, 'John', 'Doe', 'john@example.com');

    jest.spyOn(prismaService.user, 'findUnique').mockResolvedValue(result);

    const user = await usersService.findOne(id);

    expect(user).toEqual(result);
    expect(prismaService.user.findUnique).toHaveBeenCalledWith({
      where: { id: parseInt(id) },
    });
  });

  it('should update a user', async () => {
    const id = '1';
    const updateUserDto = {
      firstName: 'John',
      lastName: 'Doe Updated',
      email: 'john_updated@example.com',
    };

    const result = createMockUser(
      1,
      updateUserDto.firstName,
      updateUserDto.lastName,
      updateUserDto.email,
    );

    jest.spyOn(prismaService.user, 'update').mockResolvedValue(result);

    const user = await usersService.update(id, updateUserDto);

    expect(user).toEqual(result);
    expect(prismaService.user.update).toHaveBeenCalledWith({
      where: { id: parseInt(id) },
      data: updateUserDto,
    });
  });

  it('should remove a user', async () => {
    const id = '1';
    const result = createMockUser(1, 'John', 'Doe', 'john@example.com');

    jest.spyOn(prismaService.user, 'delete').mockResolvedValue(result);

    const user = await usersService.remove(id);

    expect(user).toEqual(result);
    expect(prismaService.user.delete).toHaveBeenCalledWith({
      where: { id: parseInt(id) },
    });
  });
});

function createMockUser(
  id: number,
  firstName: string,
  lastName: string,
  email: string,
): any {
  return {
    id,
    firstName,
    lastName,
    email,
    createdAt: new Date(),
    updatedAt: new Date(),
  };
}
In this file, we are setting up a testing module with the UsersService and PrismaService providers. We then create a test to ensure the UsersService is defined. You can add more tests for the create, findAll, findOne, update, and remove methods to ensure they behave as expected.
We'll also have to update our users.controller.spec.ts to include UsersService and PrismaService as providers because at the moment they not available to the testing module
import { Test, TestingModule } from '@nestjs/testing';
import { UsersController } from './users.controller';
import { UsersService } from './users.service';
import { PrismaService } from '../prisma.service';

describe('UsersController', () => {
  let controller: UsersController;

  beforeEach(async () => {
    const module: TestingModule = await Test.createTestingModule({
      controllers: [UsersController],
      providers: [
        UsersService,
        {
          provide: PrismaService,
          useValue: {},
        },
      ],
    }).compile();

    controller = module.get<UsersController>(UsersController);
  });

  it('should be defined', () => {
    expect(controller).toBeDefined();
  });
});
These tests cover the main scenarios for each method in the UsersService. You can run the tests by executing the following command:
npm test
This will run the tests and display the results. If needed, you can add more tests to cover edge cases or specific scenarios.
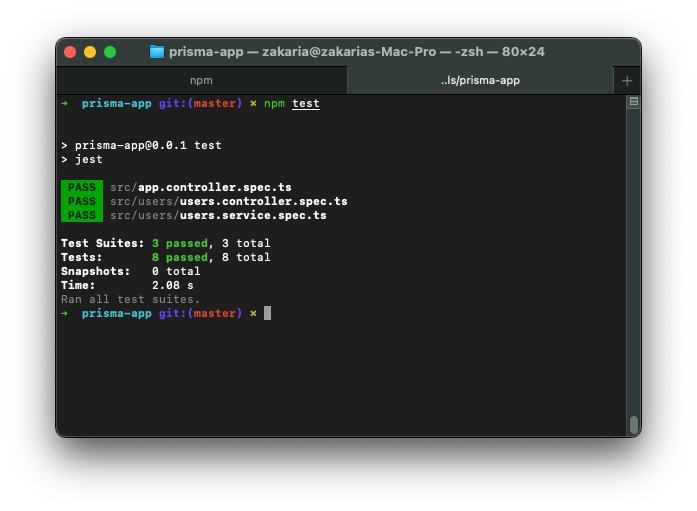
Our tests passed!!! so congratulations, you've reached the end of this tutorial! You've learned how to use Prisma with NestJS to create a powerful and scalable web application. With a better understanding of how Prisma works and how it can be integrated with NestJS, you're now equipped to build more robust applications with ease.
You can always go back to the GitHub repository for the source code, feel free to ask any questions there.
Keep exploring and experimenting with these tools to further enhance your skills and develop even more impressive applications. Good luck and happy coding!